Contents – Quick Navigation
- Installation
- How To Create a Maintenance page
- How to Create The Main Menu
- Main Slider – Create Main Slider Page
- Main Slider – How To Create Slides
- Using Theme Customizer With Live Preview
- Using Theme Settings
- Custom Post Types – Video/ Photo Album /Event/ Album
- Custom Page Templates – Archives/ Contact With Sidebar/ Contact Full Width / Discography Archive/ Next Events/ Past Events/ All Events/ Videos/ Full Width Page
- reCAPTCHA Validation
Installation of JamSession Theme
The instalation is really easy and intuitive, so please carefully read the following instructions. If you have any other technical questions, feel free to send us a mail to support@smartwpress.com.
There are two ways to install a WordPress theme:
- Directly upload the zipped theme file via WordPress admin panel.
- Upload the unzipped theme folder, directly on your server using a FTP client.
Install JamSession Theme Using WordPress Theme Installer
1. Log in to WordPress admin dashboard and navigate to Appearance -> Themes
2. Click on the 2nd tab, Install Themes and choose Upload option.
3. For upload, choose the file jamsession.zip, which can be found inside the archive downloaded from ThemeForest.
4. Once the upload has finished, click Activate.
5. You will see the following message: This theme requires the following plugin: JamSession Post Types. Please choose Begin Installing Plugin option.
6. Click on Install link and that is all.

Install JamSession Theme Using a FTP Client.
1. Log In to your site using your FTP client, and enter to your WordPress theme folder, wp-content/themes.
2. Unzip jamsession.zip file and upload jamsession folder to wp-content/themes location.
3. Log into your WordPress admin dashboard and navigate to Appearance -> Themes and activate the teme.
4. You will see the following message: This theme requires the following plugin: JamSession Post Types. Please choose Begin Installing Plugin option.
5. Click on Install .
Please navigate to the next pages for the rest of the installation instructions.
THEME CONFIGURATION
The configuration of JamSession theme is simple and intuitive. Below, we’ll describe how to define configure it according to your needs by defining the menu, using theme customizer, theme settings, adding slides, image posts, video custom posts and events.
Creating a maintenance page
You may want to show the visitors a custom page, while setting up your website. JamSession theme helps you do that, by creating a maintenance page. Please follow this steps:
1. Go to Pages -> Add New
2. Select a title for your page (like “Comming Back Soon” or “Comming Soon”). This name will be visible on the maintenance page.
3. Insert the text content that you want your visitors to see.
4. Add a featured image for this page – the featured image will be the background for the new maintenance page, so please use a good resolution.
5. Set the page template for this page to Maintenance Page from the bottom right part of the page.
6. Save the page.
7. Go to Appearance-> JamSession Settings
8. On General Options you must set Maintenance Mode to Maintenance Mode Enabled and on Maintenance Page select the page you’ve just created, based on the Maintenance Page template.
9. Press on Save Changes and this should be all. Admin and logged in users should be able to see the real version of the website, while the rest of the visitors will see the maintenance page.
Main Menu
Go to Appearance -> Menus and click on create a new menu option. Give it a name, Main Menu for instance and click on Create Menu. A new tab tab option, Manage Locations should appear now. Edit your Menu by adding elements from the left side of the page. When you are done, click on the 2nd tab, Manage Locations, select the menu you just defined and click Save Changes. The menu should now be visible on the front page.
Main Slider
In order to have the main slider as homepage of your website, you just need to create a empty page and use Main Slider Page as template for that page.
1. Go to Pages -> Add New
2. Add a title for the new created page – Main Slider Page
3. Select the template to be used for that page – Main Slider Page
4. Click on Publish and the page is now created.
5. Go to Appearance -> Customize
6. Select Static Front Page option on the bottom left of the page
7. Select the page you’ve just created – Main Slider Page for static front page
8. Click on Save and you have a slider on homepage.
Each slide, can be defined from WordPress admin menu. This functionality is provided by JamSession Post Types plugin, that we’ve just activated. After activating the plugin, new menu options should be available on the WordPress admin menu.
At the first point of instalation, JamSession theme comes with a default slide. It will be visible as long as no other slide is defined.
Creating Slides
Go to Slides -> Add New Slide. The following fields need to be filled:
1. Post Ttitle – this is the message that appears on the bottom right part of the slider.
2. Hide Title & Message – Allows you to hide the title and link message from the slider.
3. Message – Link Message that appears on the bottom right of the page.
4. URL – URL of the page that will be loaded when the visitor clicks on Message.
5. YouTube URL, Vimeo URL – If YouTube or Vimeo is present, the slider will show the play button, allowing the visitor to see the video in full screen. If both fields are filled, the slider will play YouTube.
6. Featured Image – This is the main slider image.
Featured image MUST be set, otherwise the slider will not appear on the front page.
Theme Customizer
JamSession implements WordPress theme customizer, that provide the ability to change the layout and preview the changes in real time. To access the Customizer, go to WordPress admin menu, and select Appearance -> Customize.
The following options are implemented for theme customizer:
Header Layouts: It offers the ability to change the menu bar position, according to your needs
Menu Options: It is used to change the menu text color, menu background color and the width of menu bar (full width or variable width according to the number of menu items)
Logo Color Options: Set a separate color for logo text and logo background, or make the logo background invisible.
Secondary Color: Set the secondary color of the website used for anchor text, slider title, category box, etc.
Theme settings
Theme Settings helps you easily take control over different settings of your website, by allowing you to choose between text or image logo, upload your logo or a custom favicon, set the email address for contact form, or change the background image for the inner pages of the website. It also allow to set the url to the profile page of your band, over different social networks. You can also set the copyright text that will be displayed at the bottom of your page, and add the analytics code.
The settings page has three tabs, each one related to a separate section of your website. The first tab, General Options allows you to decide whether to use the name of your website or a custom image as a logo. By default, the website name is used as logo. It also allows you to add a custom favicon image, set the email address for contact form, change the background image for the inner pages of the website, hide or show the Upcoming Events tab on the main page, set the slider interval or insert the reCaptcha public and private keys.
The second tab, Social Options sets the url to the profile pages of your band over several social networks. Every field that is set will generate a link to your social profile at the bottom of the main page and on the contact page.
The third tab, Footer Options allows you to add copyright text, URL to copyright text and analytics code without changing the source files.
Custom Post Types
JamSession theme allows you to add custom post types for photo gallery, videos, discography and events.
Adding a video
Select Videos -> Add New Video from WordPress admin panel. Add the title, text content, featured image and provide the YouTube or Vimeo URL to the video. Add a video category or select a video category you have already defined. Click Publish .
Adding a photo album
Select Photo Albums -> Add New Photo Album from WordPress admin panel. Add the title, text content, featured image and drag or upload images to upload area. Add a Photo Album category or select a existing one. Click Publish and you’re done.
Adding an event
Select Events -> Add New Event from WordPress admin panel. Add the title, text content, featured image and fill specific event data fields.
Adding an album
Select Albums-> Add New Album from WordPress admin panel. Add the title, text content, album cover as featured image and fill specific album data fields. Upload desired mp3 media to upload area and drag items according to desired song order. Click Publish and your new album is published.
Custom page templates
JamSession theme comes with several custom page templates, for archives, contact page with sidebar, full width contact page, discography archive, photo albums archive, events archive, videos archive and Full Width Page Template. Adding a custom page to your website, is really simple and can be done from WordPress admin menu.
Adding archives page
Go to Pages -> Add New. Add the page title and from the Page Attributes module, set Template to Archives. Click Publish and your Archives page is ready.
All the custom pages can be added to website in a similar way.
Adding contact with sidebar page
Go to Pages -> Add New. Add the page title and from the Page Attributes module, set Template to Contact Page. Click Publish and your contact tpage is ready.
Adding full width contact page
Go to Pages -> Add New. Add the page title and from the Page Attributes module, set Template to Contact Page Full Width. Click Publish and your contact tpage is ready.
Adding discography archive page
Go to Pages -> Add New. Add the page title and from the Page Attributes module, set Template to Discography. Click publish and your discography archive page is ready.
Adding photo albums archive page
Go to Pages -> Add New. Add the page title and from the Page Attributes module, set Template to Photo Gallery. Click Publish and your photos archive page is ready.
Adding next events archive page
Go to Pages -> Add New. Add the page title and from the Page Attributes module, set Template to Events. Click Publish and your events archive page is ready.
Adding past events archive page
Go to Pages -> Add New. Add the page title and from the Page Attributes module, set Template to Past Events. Click Publish and your events archive page is ready.
Adding all events archive page
Go to Pages -> Add New. Add the page title and from the Page Attributes module, set Template to All Events. Click Publish and your events archive page is ready.
Adding videos archive page
Go to Pages -> Add New. Add the page title and from the Page Attributes module, set Template to Video Gallery. Click Publish and your videos archive page is ready.
Adding a full width page
When creating a new page, the default page template has a right sidebar. JamSession theme comes with a full width page template. To use the full width page template, go to Pages -> Add New. Add the page title and desired page content and set Template to Full Width Template. Click Publish.
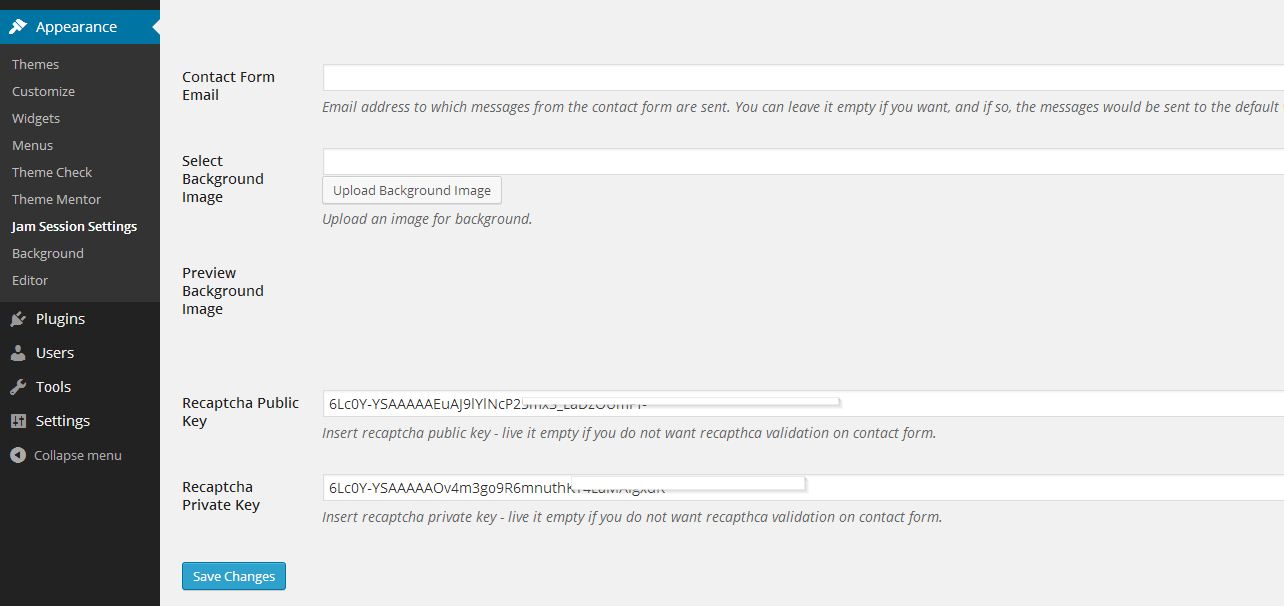
reCAPTCHA Validation
By default, recaptcha validation is disabled. To enable it, you must enter recaptcha public and private key to JamSession settings. Please follow the next steps:
1. Go to Appearance -> JamSession Settings
2. Select the General Options tab
3. At the bottom, insert recaptcha public key and recaptcha private key. You can sign up for recaptcha keys by following this link.